AI in SharePoint Public Preview: SharePoint Copilot Setup Guide

Microsoft Copilot in SharePoint introduces new AI features through Microsoft 365 Copilot. AI in SharePoint allows users to interact with SharePoint content in natural language with AI-generated responses.

This feature used to be known as Knowledge Agent. It helps users discover files, find answers, and get their work done faster. Organizations can try out these AI features before release during the SharePoint Public Preview.

This guide describes how to enable Copilot in SharePoint in your organization. It covers licensing, PowerShell setup, site activation, and feature verification.
Prerequisites

Before enabling Copilot in SharePoint, make sure all requirements below are completed.

Microsoft 365 Copilot License

Users who want to use Copilot in SharePoint must have an active Microsoft 365 Copilot license.

Administrator Role

The PowerShell setup must be completed by:

  • SharePoint Administrator
  • Global Administrator

Opt-In to Public Preview

SharePoint Public Preview is turned off by default. Administrators must enable it through PowerShell.

The feature can be enabled:

  • For all sites
  • For selected sites only
  • For all sites except selected sites

SharePoint Online Management Shell

Install SharePoint Online Management Shell version 16.0.26615.12013 or later.

Use this command to update:

Anthropic Sub-Processor

To use advanced AI in SharePoint features, enable Anthropic as a Microsoft AI sub-processor. If Anthropic is not enabled, SharePoint uses another reasoning model with limited AI capabilities.

Note: Anthropic is turned off by default for users in the European Union and the United Kingdom. Admins in these regions must enable it in the Microsoft Admin Center to use all preview features.

Enable Anthropic as an AI Sub-Processor

To enable advanced AI capabilities in Microsoft Copilot in SharePoint, do the following.

  1. Sign in to the Microsoft 365 Admin Center.
  2. In the left menu, select Copilot and open Settings.
  3. Open the Data Access page.
  4. Select AI providers operating as Microsoft sub-processors.
  5. Under Available sub-processors for your organization, enable Anthropic.

For detailed steps, refer to Microsoft documentation.

Opt-In via PowerShell

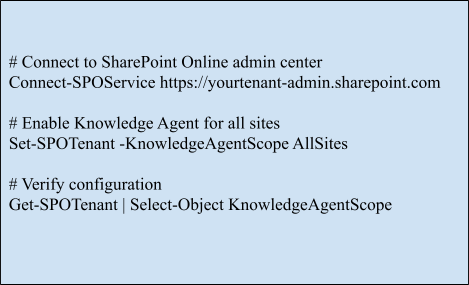
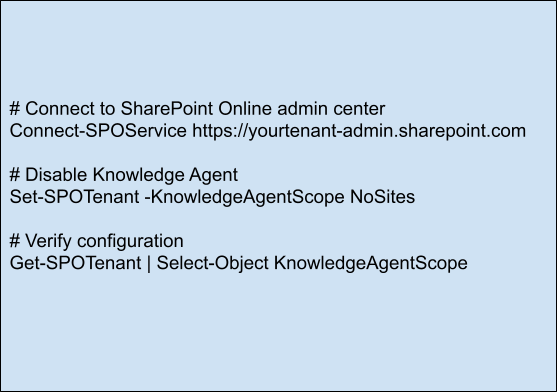
During the SharePoint Public Preview, AI in SharePoint is managed through PowerShell using KnowledgeAgent settings.

Enable AI in SharePoint on All Sites
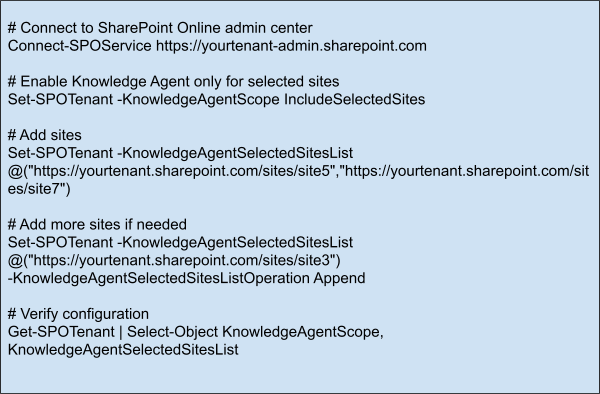
Enable AI in SharePoint on Specific Sites Only
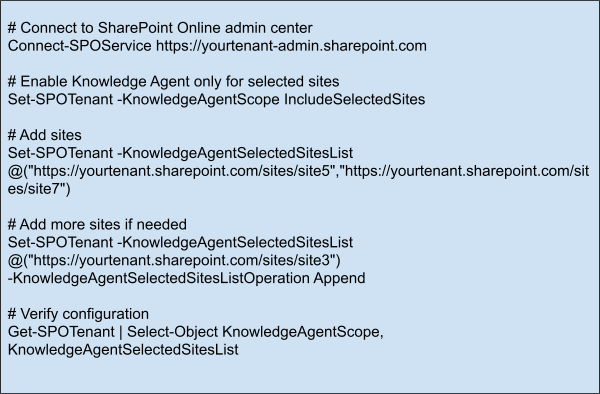
Enable AI Everywhere Except Selected Sites 
Disable AI in SharePoint
Verifying the Feature is Active

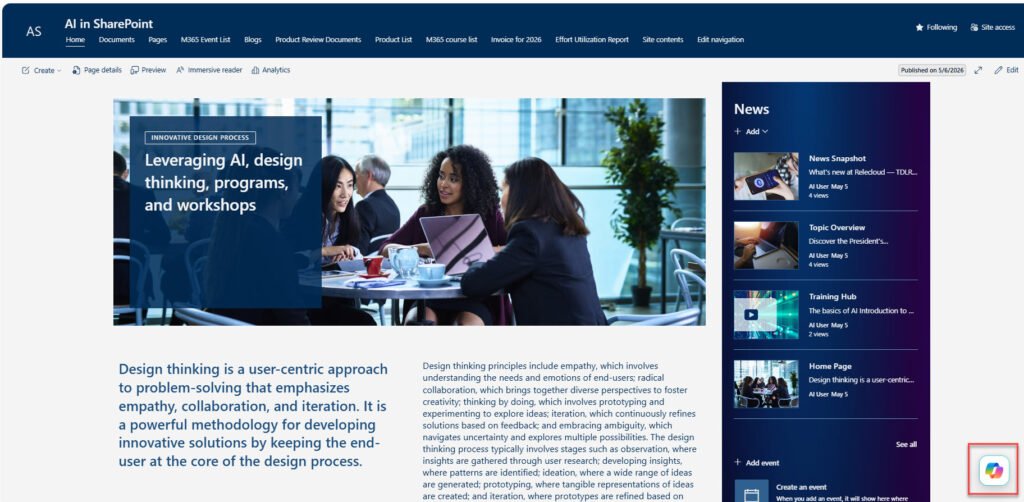
Once activated, users will see the AI Actions button on the right side of the SharePoint site.

This confirms that the Copilot in SharePoint capabilities are enabled for the site collection.

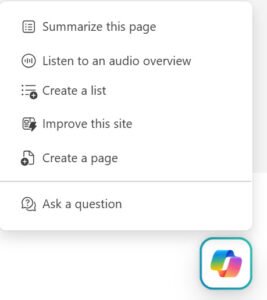
The AI Actions panel provides users with access to AI-powered tools to boost productivity and automate tasks. 

Users can access features such as:

  • Summarize this page
  • Listen to an audio overview
  • Create a list
  • Create a page
  • Improve this site
  • Ask a question

“Summarize this page” provides a summary of the current page to users.

Page content reads “Listen to an audio overview” using AI-generated audio. It is useful for users who like audio or are doing multiple tasks at the same time.

Users can also create SharePoint lists and pages with AI assistance. The “Improve this site” feature recommends improvements to the organization and usability of the content.

The “Ask a question” option allows users to ask questions and get answers from the current SharePoint site.

These AI in SharePoint features help teams collaborate, reduce manual effort, and share knowledge. 

Activating the Agent Skills Feature from the Site Collection

After the PowerShell setup is complete, admins can enable the Agent Skills feature from the SharePoint site settings.

What is the Agent Skills Feature?

The Agent Skills feature enables AI-powered agent capabilities for a SharePoint site collection.

Once activated, the site can use Copilot in SharePoint features with contextual responses based on the content stored in that site collection.

Step-by-Step Activation Guide

  1. Open the SharePoint site collection.
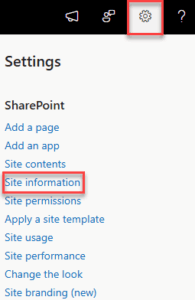
  2. Click the Settings icon in the top-right corner.
  3. Select Site information.
  4. Click View all site settings.
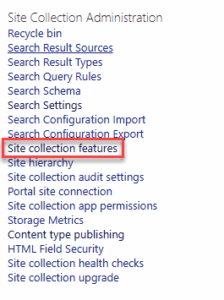
  5. Under Site Collection Administration, select Site Collection Features.
  6. Find the Agent Skills feature.
  7. Click Activate.

Verifying the Feature is Active

Go back to the Site Collection Features page to verify activation.

You should now see an Active status with a Deactivate option for the feature Agent Skills.

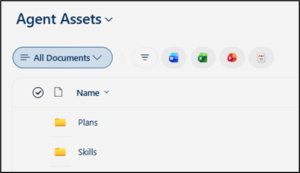
When SharePoint is activated, a document library is automatically created in Site Contents. The library has two default folders:

  • Plans
  • Skills

Skills Folder Contains Markdown (.md) files used by SharePoint Agents.

Users can create or upload Markdown files that dictate how the AI should behave, automate actions, and provide instructions for AI-driven interactions. 

Deactivating the Feature

To remove AI capabilities from a specific site collection:

  1. Open Site Settings.
  2. Go to Site Collection Administration.
  3. Open Site collection features.
  4. Find Agent Skills.
  5. Click Deactivate.

Only Site Collection Administrators or higher roles can activate or deactivate this feature.

Summary & Quick Reference

The table below summarizes the full setup process for Microsoft Copilot in SharePoint.

Step Action
1 Verify that all users have a Microsoft 365 Copilot license 
2 Install or update the SharePoint Online Management Shell 
3 Enable Anthropic in Microsoft 365 Admin Center 
4 Run PowerShell commands to configure KnowledgeAgentScope 
5 Activate the Agent Skills feature 
6 Verify activation and test the feature 

With  AI in SharePoint, organizations can improve search, automate tasks, reduce manual work, and improve the SharePoint experience during the SharePoint Public Preview.
Posted in AI

Microsoft 365 Records Management: An In-Depth Guide for Comprehensive Control

Managing business data is harder than ever. Companies deal with emails, files, chats, contracts, and sensitive records every day. Without a clear system, companies can lose important data, delete it by mistake, or keep it longer than needed. 

Many companies use Microsoft 365 records management tools to keep data organized and reduce risk. Microsoft Purview records management also helps them meet legal and compliance rules.

This guide explains how records management in Microsoft 365 works and why it matters. It also shows how businesses can build a stronger compliance plan with Microsoft Purview. 
Why Microsoft 365 Records Management Matters

Businesses create and store large amounts of information every day. Without a proper system, data can become hard to manage. This can lead to security risks, compliance problems, and higher storage costs.

Microsoft 365 compliance management tools help businesses:

  • Keep important records for the right amount of time
  • Remove old or unnecessary data
  • Apply rules across Microsoft 365 apps
  • Lower compliance risks
  • Improve daily operations

With Microsoft Purview records management, many of these tasks can run automatically.

Understanding Retention Policies and Labels in Microsoft 365

In Microsoft 365, retention policies and labels help businesses protect data. They also help companies follow compliance rules. The Microsoft Compliance Center uses these tools to manage business information.

Retention Policies and Labels: Guardians of Data

Retention policies and labels stop businesses from losing important Microsoft 365 data. This includes Outlook emails, SharePoint documents, and Microsoft Teams messages.

These tools help organizations:

  • Follow company policies and legal rules for keeping data over a set period.
  • Reduce risks linked to litigation or security breaches by removing outdated content responsibly
  • Improve knowledge sharing by helping users access relevant and updated information

The retention settings in Microsoft 365 records management support different business needs, including:

  • Retain-only: Keep content forever or for a set period
  • Delete-only: Permanently remove content after a specific time
  • Retain and then delete: Keep content for a set period before deleting it permanently

Navigating Retention Settings and Content Interaction

Retention settings help protect content in its original location, even if users edit or delete it. Microsoft 365 automatically keeps copies of retained content across different platforms.

SharePoint and OneDrive

Microsoft 365 keeps copies in the Preservation Hold library to protect important files and documents.

Exchange Mailboxes

Copies stay in the Recoverable Items folder to protect important email records.

Teams and Yammer Messages

Microsoft 365 saves Teams and Yammer message copies in a protected folder.

Revealing Details: Retention Policy vs. Retention Label

Microsoft 365 uses retention policies and labels to manage records and data. Both methods support compliance, but they work differently.

Retention Policies: Container-Level Governance

Retention policies work at the container level. Administrators can apply the same retention settings across entire mailboxes, sites, or locations.

This helps organizations manage compliance across large groups of content more easily.

Retention Labels: Granular Control at Item Level

Retention labels give administrators more detailed control at the item level. This helps when different files or emails need different retention settings inside the same mailbox or location.

Retention labels also move with the content across Microsoft 365. Retention policies stay connected to specific containers only.

Retention labels in Microsoft Purview records management also offer advanced features, including:

  • Starting retention from labeling events or event-based triggers
  • Using trainable classifiers to identify content automatically
  • Applying default labels to SharePoint documents
  • Supporting disposition reviews before permanent deletion
  • Marking records to provide proof of deletion after the retention period ends

What Are the Rules of Microsoft 365 Retention?

In Microsoft 365 records management, content can use more than one retention policy or retention label at the same time. Microsoft uses retention rules to decide what happens to that content.

Retention Wins Over Deletion Example

An item follows two retention policies:

  • Retention policy 1 deletes content after 1 year
  • Retention policy 2 keeps content for 2 years

In this case, the longer retention period wins. Microsoft 365 keeps the content for 2 years before deleting it.

Longest Retention Wins Example

An item follows two retention policies and one retention label:

  • Retention policy 1 keeps content for 1 year
  • Retention policy 2 keeps content for 10 years
  • Retention label keeps the item for 2 years

In this case, the 10-year retention policy wins because it has the longest retention period.

This process helps with records retention management and protects important data for the right amount of time.

Explicit Wins Over Implicit for Deletion Example

An item follows:

  • Retention policy 1 deletes content after 1 year
  • Retention label deletes the item after 3 years

In this case, the retention label wins because it was applied directly to the item. The item gets deleted after 3 years.

Shortest Deletion Wins Example

An item follows two retention policies:

  • Retention policy 1 deletes content after 1 year
  • Retention policy 2 deletes content after 2 years

In this case, the shorter deletion period wins. The item gets deleted after 1 year.

How to Create and Apply Microsoft 365 Retention Labels

Microsoft 365 records management uses retention labels to manage and organize data.

These labels help businesses follow compliance rules. They also improve records management in Microsoft 365 by applying retention settings correctly.

Note: Users need global administrator or compliance administrator access to create and manage retention labels.

Understanding Retention Labels

Retention labels are an important part of Microsoft 365 records management. They help businesses decide how long content stays saved and what happens to it later.

Step 1: Navigate to the Microsoft 365 Compliance Center

Go to Microsoft Compliance > Records Management > File Plan.

Select “Create a label” to start the process. Add a label name and description that users and administrators can understand easily.

Step 2: Define Label Settings

In the dialog box, enter the label name and description.

This step helps users identify and manage labels more easily.

Step 3: Customize Retention Settings

Set the retention options based on your business needs. Choose:

  • How long content stays retained
  • When retention starts
  • What happens after the retention period ends

You can also add business details for the label. These details are optional and customizable.

File Plan Descriptors Columns

File plan descriptors give businesses more ways to organize and manage labeled content.

Microsoft 365 includes default file plan descriptors such as:

  • Business function/department
  • Category
  • Authority type
  • Provision/citation

Define Label Setting

Choose one of these retention settings:

  • Retain items forever or for a specific period: Items stay retained for the selected time. After that, Microsoft 365 deletes them from storage.
  • Enforce actions after a specific period: Items are not retained. After the selected period, the system can delete or relabel them.
  • Just label items: This option only classifies items. Users can still edit, move, or delete them.

Choose What Happens During the Retention Period

  • Retain items even if users delete: Users can edit items or remove labels. If users delete items, Microsoft 365 keeps copies in a secure location.
  • Mark items as a record: Users cannot edit or delete items. Only admins can change or remove the label.

For SharePoint and OneDrive files, actions depend on whether the record is locked or unlocked.

  • Mark items as a regulatory record: Users and admins cannot edit, delete, or remove labels from items. Admins can only increase the retention period or publish the label to other locations.

These settings help improve records retention management and support compliance goals.

Disposition Stages

Disposition stages support content deletion after the retention period ends.

This process helps businesses manage workflows, reviews, and audits before deleting content. Many regulations require this feature.

Disposition review settings work at the label level. Businesses can assign one or more reviewers.

Reviewers only see the content they need to review based on permissions.

Step 4: Review and Create

Review all label details carefully. After that, create the retention label.

Once the label is created, Microsoft 365 shows options for publishing the retention label.

Publishing Retention Labels

Creating labels is only the first step. Businesses must publish labels to use them across Microsoft 365 locations.

Step 1

Go to the Records Management tab. Select Label Policies and click Publish Labels.

Step 2

In the pop-up window, select the labels you want to publish.

Step 3

Admin units help businesses limit policies to specific user groups.

These units also affect location options inside Microsoft Entra ID.

Step 4

Choose whether the policy should be Static or Adaptive.

Step 5

If you select Adaptive in Step 4:

  • Click Add Scopes
  • Select one or more adaptive scopes
  • Choose the locations you want to use

If you select Static in Step 4:

  • Choose the locations where the retention labels should apply

This setup helps improve records management in Microsoft 365.

Step 6

Add a name and description for the policy. Review the settings before publishing.

The selected retention labels will then publish across Microsoft 365 locations.

For SharePoint locations, labels usually appear within one or two days.

For Exchange and Microsoft 365 Group locations, labels can take up to seven days to appear in Outlook.

Note

After businesses create and save a retention label or label policy, they cannot change:

  • Retention label names
  • Policy names
  • Scope type (Adaptive or Static)
  • Most retention settings
  • Record settings

If retention depends on the labeling date, businesses also cannot change the retention period.

Businesses can only delete retention labels that:

  • Are not part of retention label policies
  • Do not use event-based retention
  • Do not mark items as regulatory records

Understanding the Relationship Between Labels and Policies

A retention label can work with many retention label policies. A single policy can also include many labels.

However, auto-apply retention label policies can only use one label.

This setup helps businesses manage labels and improve records management in Microsoft 365.

Publishing Labels

After businesses create labels, they must publish them in the right locations.

Retention label policies decide where Microsoft 365 uses labels and applies them to content.

This process is part of Microsoft 365 records management and helps businesses manage content in different locations.

Conclusion

Creating and applying retention labels in Microsoft 365 takes planning and careful setup.

These steps help businesses manage data and follow compliance rules. They also improve records retention management in Microsoft 365.

SharePoint Premium: AI-Powered Content Management for Smarter Workflows

Microsoft SharePoint Premium is an AI-powered content management tool. It helps businesses manage documents, improve search, and automate work.

SharePoint uses AI to organize files and help users find them faster. It also improves intelligent document management across different platforms.

With AI workflow automation, SharePoint Premium can pull important details from documents automatically. This saves time and reduces manual work.

These SharePoint Premium features help businesses manage documents and improve daily work.

SharePoint Premium uses a pay-as-you-go pricing model with an Azure subscription. Costs are tracked through a Syntex meter.

Businesses can also use SharePoint consulting services to improve document management and support workflow automation for enterprises.

SharePoint Premium Services

Here are the SharePoint Premium products for AI-powered content management and workflow automation for enterprises:

  • Prebuilt document processing: Uses AI to get data from invoices, receipts, and IDs. It also helps with SharePoint document automation.
  • Structured and freeform document processing: Helps users build models to get data from different document types.
  • Unstructured document processing: Gets data from Office files with different layouts. This improves intelligent document management.
  • Content assembly: Creates documents using templates and business data.
  • Image tagging: Adds keywords to images so users can find them faster.
  • Taxonomy tagging: Uses tags and terms to organize content.][;
  • Document translation: Changes documents into different languages.
  • Syntex eSignature: Let users send and sign documents online.
  • Optical Character Recognition (OCR): Turns scanned files into editable text.
  • Microsoft 365 Archive: Stores old emails and files in the cloud.
  • Microsoft 365 Backup (Preview): Backs up Microsoft 365 data in the cloud.

These SharePoint Premium features help teams manage files, automate AI workflows, and use SharePoint Premium more easily.

Document Processing Models

  • Prebuilt document processing: Uses ready-made models to get data from common files. No extra training is needed.
  • Structured and freeform document processing: Structured processing uses templates for invoices and contracts. Freeform processing uses AI to read different file types.
  • Unstructured document processing: Gets key data from emails and files with different layouts. It helps with intelligent document management.
  • Content Assembly: Creates contracts, letters, and other business documents using templates and SharePoint data.
  • Image tagging: Uses AI to add tags to images, making them easier to find.
  • Document translation: Translates documents into different languages in SharePoint.
  • Create a signature request: Let users send files to internal and external users for online signing.

Microsoft 365 Archive and Backup

Microsoft 365 Archive

Microsoft 365 Archive keeps old data safe and easy to search. The data stays inside Microsoft 365, so there is no need to move files to another system.

Microsoft 365 Backup (Preview)

Microsoft 365 Backup saves SharePoint, Exchange Online, and OneDrive data. It helps teams recover deleted files quickly. The backup data stays secure in Microsoft 365.

These SharePoint Premium features also support labels to manage sensitive content.

Additional Services

  • Merge PDF files: Combines many PDF files into one file.
  • Extract PDF pages: Splits PDF files and shares only the needed pages.
  • Optical Character Recognition (OCR): Changes scanned files and images into searchable text. It also helps with SharePoint document automation.

Conclusion

Microsoft SharePoint Premium helps teams manage files and automate daily work. It improves search, organizes content, and supports AI workflow automation and intelligent document management.

The platform also tracks usage and costs through the Syntex meter. Businesses can also use SharePoint consulting services for setup and support.

How Microsoft Entra Conditional Access Blocks High-Risk AI Agents

Welcome to the workplace of the future, a vision Microsoft brought to life at Ignite 2025.

In this new reality, your organization’s “team” is no longer limited to people. Alongside analysts, engineers, and business users, AI agents are now part of everyday operations.

These agents can:

  • Create employee onboarding emails
  • Coordinate workflows across applications
  • Analyze data and generate reports
  • Trigger HR actions
  • Sync files across systems
  • Monitor daily IT checks
  • Run continuously without fatigue

They work faster, scale effortlessly, and never slow down.

But with this level of autonomy comes a new challenge.

AI agents can behave in unexpected ways, and in a security context, that unpredictability poses real risk.

At Ignite 2025, Microsoft made this clear: AI agents must be treated as identities. And every identity requires strong governance, monitoring, and Zero Trust protection.

This is where Microsoft Entra ID and Microsoft Entra Security play a critical role- helping organizations detect unusual behavior early and strengthen AI agent security across their environment.

Why This Scenario Matters in the Age of AI-Driven Workforces

AI agents are no longer simple background scripts. They now act as digital workers with real responsibilities.

They can:

  • Send onboarding messages
  • Update HR systems
  • Move financial data
  • Handle support tickets
  • Run approvals
  • Communicate with APIs
  • Connect services across systems

Because they have access and permissions, they also introduce AI security risks.

Not because they intend to, but because things can go wrong.

Where AI Agents Become High-Risk

AI agents can become risky in several situations:

  • API keys or secrets are exposed
  • Login attempts happen from unusual locations
  • Automation loops behave unexpectedly
  • Agents try to access unfamiliar resources
  • Code updates change behavior unintentionally
  • Test agents move into production
  • Compromised identities trigger harmful actions

These are real AI security risks that organizations must address.

Imagine an HR agent trying to access financial systems at an unusual time from another region. That is not normal behavior; it’s a warning sign.

In such cases, automated protection is essential.

Microsoft Entra High-Risk Agent Protection: Your AI Security Shield

With Microsoft Entra Conditional Access and built-in intelligence, Microsoft evaluates AI agents the same way it evaluates human users.

It monitors:

  • Impossible travel
  • Abnormal sign-in patterns
  • Suspicious IP activity
  • Behavioral anomalies
  • Token misuse
  • Unusual API calls
  • Signs of credential compromise

These capabilities are part of modern conditional access policies.

When risk reaches a high level, action is immediate:

High Risk = Block the agent instantly. Investigate afterward.

This approach aligns with zero-trust security microsoft, where nothing is trusted without verification.

Pros & Cons (Realistic, Practical View)

Pros

  • Automatically blocks unsafe or compromised agents
  • Protects sensitive applications and data
  • Stops issues before they spread
  • Provides continuous monitoring
  • Supports modern microsoft entra security strategies
  • Aligns with Zero Trust principles

Cons

  • Some workflows may pause temporarily
  • Teams must review risk alerts
  • False positives can occur in rare cases

However, a temporary pause is far safer than a security breach.

A Futuristic Analogy You Can Relate To

By 2028, billions of AI agents may operate alongside humans.

In such an environment:

  • AI handles onboarding
  • Automation manages daily operations
  • Systems run continuously

But imagine this scenario:

An HR agent suddenly:

  • Tries to access restricted financial data
  • Logs in from multiple regions within seconds
  • Makes repeated unusual API calls
  • Requests permissions that it never needed before

What would you do?

You would immediately block its access.

That is exactly what microsoft entra conditional access does, automatically and instantly.

Final Thoughts: Ignite 2025 Made the Future Clear

Organizations are entering a new phase where AI agents are part of everyday operations.

With this shift, AI agent security is no longer optional; it is essential.

Organizations can use Microsoft Entra ID, identity and access management, and conditional access policies to protect their systems. These tools also support secure innovation. 

This approach strengthens:

  • Security
  • Stability
  • Compliance
  • Trust

It also supports a strong zero-trust security microsoft model for the future.

Adopting these practices ensures your organization can use AI confidently, without compromising security.

Next in the Series: Part 2: Configuration & Implementation

The next blog will walk through step-by-step configuration for:

  • Scenario 1: Allow only approved agents to access resources
  • Scenario 2: Automatically block high-risk agents
  • Enhanced Object Picker usage
  • Custom Security Attributes for agents
  • Testing with Report-Only mode
  • Microsoft’s recommended best practices

More AI agent security blogs are on the way as part of this governance series.

SharePoint Agents: A New Era of Intelligent Collaboration

The challenge with SharePoint isn’t storing information, it’s finding the right piece of it when you need it.

Important documents are often buried across sites, libraries, and folders. Even when the content exists, it can take time to locate, understand, and use it effectively.

SharePoint agents change how this works.

With SharePoint AI and AI in SharePoint, users can ask simple questions and get direct answers. Instead of searching through multiple files, they can quickly find what they need and move forward with their work.

What Are SharePoint Agents?

SharePoint agents are built-in AI assistants. They understand your SharePoint content and answer questions in simple language.

Instead of searching through folders or reading long documents, users can simply ask:

  • Where is the latest onboarding document?
  • Summarize our travel policy
  • Show files related to Project XYZ
  • Answer policy-related questions

The agent finds the right content quickly. It summarizes information and shows users where to go.

These capabilities are powered by Microsoft SharePoint AI and supported by SharePoint automation. They help teams work more efficiently.

Types of SharePoint Agents

Built-in Agents

These agents are available by default in every SharePoint site. They understand site content and help users:

  • Find information
  • Navigate document libraries
  • Understand content
  • Summarize documents

Custom Agents

Organizations can create custom SharePoint agents for specific needs, such as:

  • HR Policies Agent
  • Sales Content Agent
  • Project Documentation Agent

By providing consistent, useful responses, these agents enhance SharePoint workflow automation and adhere to specified instructions. 

Why SharePoint Agents Matter

1. Instant Answers to Everyday Questions

Employees no longer need to search manually. Agents provide quick answers, improving productivity across teams.

2. Understand Long Documents Faster

Agents summarize reports and highlight key points. This helps users quickly understand important information.

3. Create Pages with Simple Prompts

Users can create SharePoint pages by simply typing what they need. This is a practical use of SharePoint automation.

4. Generate News from Existing Content

Agents can turn documents into news posts. This saves time and improves communication.

5. Tailored Support for Every Team

Custom agents can support HR, Finance, Sales, IT, and more. They provide responses based on specific business needs.

6. Built with Security in Mind

SharePoint permissions remain unchanged. If a user does not have access to a file, the agent will not show it.

Getting Started with SharePoint Agents

1. Check Licensing

To use Microsoft Copilot SharePoint, users need a Microsoft 365 Copilot license or a pay-as-you-go AI plan.

2. Create a SharePoint Agent

After signing into your SharePoint site, with site edit permissions, you can create your own agent from:

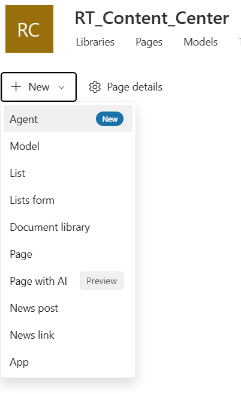
  • The site homepage: On the site home page, select New > Agent

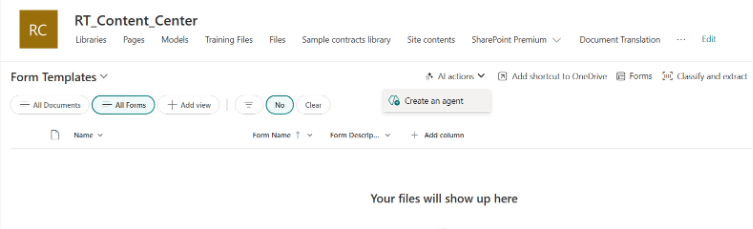
  • The command bar of a document library: On a document library, you can choose Create an agent for all supported files in this library.

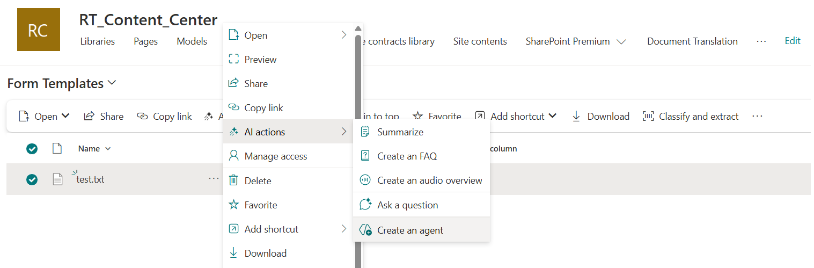
  • The context menu of the selected file(s) in a document library: Instead of creating an agent for all files in a document library, sometimes you may want to just include some files. In this case, you can select the files you want, then select Create an agent from the context menu by either right-clicking or selecting the ellipsis next to one of the selected files

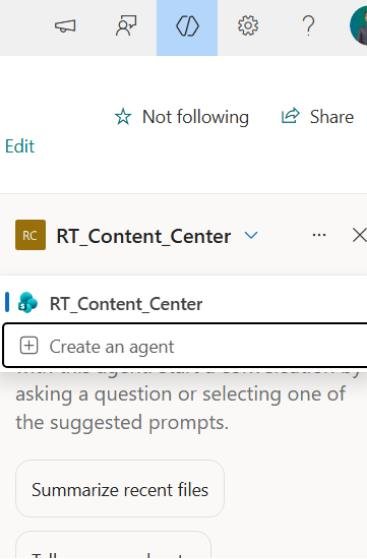
  • Agent chat pane: On any site, page, or document library, select the Copilot button on the upper right to open the agent. Then select the dropdown next to the current agent, and select Create an agent.

3. Locate SharePoint Agent on Site:

  • Sign in to your SharePoint site with your work or school account.
  • Open the agent chat pane: On any SharePoint site, page or document library, choose the Copilot icon on the upper right. The agent chat pane opens on the right side of the screen.

  • Select an agent: Select the dropdown arrow next to the current agent. You will see agents that have been approved for the site, along with a personalized list of agents based on your recent activity. You can choose the agent you want to use from the dropdown arrow. Select Show more to expand and see more if available.
  • Start asking questions: Choose a suggested prompt or write your own. Then ask the agent to summarize documents, provide project contacts, or share the latest updates. Ask follow-up questions if needed.

4. Try with Built-In Agent

Try basic tasks like:

  • Finding files
  • Summarizing documents
  • Navigating libraries

This helps you understand core SharePoint Copilot features.

5. Identify Use Cases

Focus on areas like:

  • HR policies
  • Project documents</li
  • Sales materials
  • Compliance data

These are ideal for SharePoint workflow automation.

6. Create Custom Agents

Admins can define:

  • Content scope
  • Tone and instructions
  • Business rules

7. Roll Out to Users

Train users to ask simple questions and use natural language.

8. Improve Over Time

Update agents based on feedback, business needs, and new data.

9. Share Agents

Agents can be shared with teams using a link, just like files.

Note: You can only share an agent that has been created. You can’t share the ready-made agent that comes with the site.

How SharePoint Agents Benefit Your Business

For organizations and consulting firms, SharePoint agents offer major advantages:

  • Faster access to documents
  • Better collaboration across teams
  • Improved user experience
  • Faster onboarding and training
  • Support for better decision-making

Companies can use SharePoint AI with business workflows. They improve internal productivity and help showcase your ability to deliver modern workplace solutions to clients. 

What You Need to Get Started

To use AI in SharePoint, your organization needs:

  • Microsoft 365 Copilot license or AI plan
  • Access to SharePoint sites
  • Required permissions to create or manage agents

Once set up, you can start using Microsoft SharePoint AI to improve your daily work.

Conclusion

SharePoint agents are changing how teams work with information. They make it easier to find, understand, and use content across your organization.

Businesses can use SharePoint AI with secure document management. This helps them work faster and more efficiently.

This guide is your starting point, and with the right strategy, SharePoint Agents can optimize your team’s effort in engaging with day-to-day information by enabling a faster and more secure way for searching, navigating, and summarizing the content.

Microsoft Copilot & Microsoft 365 Copilot: AI That Works with You

From BusyWork to Better Work

It’s 9 AM. You open your inbox, and it’s already full. A report is due soon, messages keep coming in, and you’re switching between tasks just to keep up. By the time you focus, something new pulls your attention away.

Now imagine having an assistant who helps you stay on track. It understands your work, handles repetitive tasks, and helps you move forward without slowing down.

That’s what Microsoft Copilot and Microsoft 365 Copilot are designed to do.

Artificial Intelligence is already part of how we work today. If you’re wondering what is Microsoft Copilot, it’s an AI assistant from Microsoft that helps you complete tasks faster and work more efficiently.

Microsoft Copilot: Your Everyday AI Companion

Microsoft Copilot AI is your everyday assistant across Windows, Edge, and the web. It’s where you go if you need help writing, thinking, or solving problems.

You might be researching, drafting an email, or exploring ideas. Microsoft Copilot is always ready to help.

What Microsoft Copilot Can Do

Here are some key capabilities that also reflect important Microsoft 365 Copilot features:

  • Write & Summarize: Draft emails quickly. Explain things in simple language. Shorten lengthy material with ease.
  • Create Images: Convert simple instructions into images for presentations or social networking.
  • Search Smarter: Get precise answers without visiting several websites. 
  • Brainstorm Ideas: When you’re stuck, brainstorm ideas or write down a plan. 

These features show the real Microsoft Copilot benefits. They save time, minimize effort, and enable you to do your job better. 

In short, Microsoft Copilot functions as a helpful helper. It is always available when you require assistance. 

Licensing & Availability

Feature Regular Copilot Copilot Pro
Cost Free $20/month
Availability Windows, Mac, iOS, Android, Web Same, plus deeper integration
Speed/Model Access Standard Faster, priority access to latest AI
Microsoft 365 Apps Limited Full integration with Word, Excel, PowerPoint, Outlook, Teams
Security/Compliance Standard Enterprise-grade

Note: Pricing and licensing terms are subject to change. Microsoft frequently updates Copilot capabilities, eligibility, and licensing models. Please refer to the current price details.

Microsoft 365 Copilot: A Smart Coworker Inside Your Apps

While Microsoft Copilot works across devices, Microsoft 365 Copilot works inside the apps you already use. These include Word, Excel, PowerPoint, Outlook, and Teams.

This strong Microsoft Copilot integration means you don’t need to switch tools. AI works with you right where you are.

What Microsoft 365 Copilot Can Do

  • Word: Allows you to write and edit documents rapidly. It also increases clarity. 
  • Excel: Transform data into insights and describe calculations in basic terms. 
  • PowerPoint: Allows you to create presentations based on a short prompt or file. 
  • Outlook: Analyse emails to help you respond quickly. 
  • Teams: Instantly capture and emphasize essential points from meetings. 

These Microsoft 365 Copilot features make it feel like a real coworker. It works 24/7 and understands your work.

Licensing & Availability

License Type Requirements Price Notes
Microsoft 365 Copilot for Business Microsoft 365 Business Standard/Premium  ~30$ USD per user/month (annual subscription) Adds Copilot features into Word, Excel, PowerPoint, Outlook, Teams
Microsoft 365 Copilot for Enterprise Microsoft 365 E3/E5  ~$30 USD per user/month (annual subscription) Same Copilot features, tailored for enterprise-scale productivity
Copilot Chat (Preview) Microsoft Entra + eligible subscription  Included at no additional cost Provides conversational AI inside Microsoft 365 apps


Note: Pricing and licensing terms are subject to change. Microsoft frequently updates Copilot capabilities, eligibility, and licensing models. Please refer to the current price details.

How Microsoft Copilot and Microsoft 365 Copilot Work Together

Even though they have similar names, they serve different purposes:

Feature Microsoft Copilot Microsoft 365 Copilot
Where it works Windows, Mac, iOS, Android, and Web Inside Word, Excel, PowerPoint, Outlook, Teams
Primary focus Everyday help, search, and creativity Productivity and collaboration within apps
Best for Quick answers, brainstorming, and research Writing, data analysis, meetings, and presentations

Think of it this way:

  • Microsoft Copilot helps you think and explore ideas.
  • Microsoft 365 Copilot helps you complete and deliver your work.

Final Thoughts: AI That Works with You

Microsoft Copilot and Microsoft 365 Copilot are designed to improve how you work. They do not replace it.

One helps you with everyday tasks across devices. The other helps you inside your apps. Together, they save time and reduce effort. They also help you focus on important work.

Start using Microsoft Copilot in your daily work and explore how Microsoft 365 Copilot features can help you work faster and smarter.

The future of work is not just faster, but it’s better, easier, and more effective.

Best Practices for SharePoint Document Management Using Document Sets

Managing documents shouldn’t feel like a never-ending search mission. If your files are scattered across SharePoint, finding the right information can be frustrating and time-consuming. That’s why organizing SharePoint properly is essential.

This is where SharePoint Document Sets come in. They help you organize documents in SharePoint by keeping related files together in one place along with shared metadata, version tracking, and automated workflows. Whether you’re managing legal case files, project deliverables, deal documents, or HR records, Document Sets streamline access and improve efficiency.

In this blog, we’ll walk you through SharePoint document management best practices and explain why Document Sets are a smart solution for businesses looking to simplify and secure their document processes.


Why Document Sets Are a Smarter Choice

A powerful way to implement SharePoint document management best practices with structure, consistency, and control.

  • Shared Metadata (Inheritance Done Right!)
    Every file in a set inherits common metadata, no more mismatched tags or missing fields.
  • Logical Grouping (Encapsulation for Documents)
    Instead of searching through multiple libraries, related files are stored together like a structured data model.
  • Version Control (State Management for Files)
    Track changes across the entire set instead of juggling disconnected document versions.
  • Automation & Workflows (No More Manual Repetitive Tasks!)
    Apply workflows to the entire set, just like running a function instead of repeating the same code.
  • Security & Access Control (Permission Scope Like a Pro)
    Set permissions at the Document Set level to ensure consistent security no need to manage access file-by-file.

Real-World Use Cases

Legal Teams (Encapsulation for Case Files)

Store contracts, agreements, and client documents together. This makes case tracking and legal retrieval seamless.

Project Management (Organized Data Structures)

Group project plans, reports, meeting notes, and deliverables are logically in one container instead of across scattered libraries.

HR Compliance (Automated Process Flow)

Manage employment contracts, policy documents, and training materials in structured sets, streamlining onboarding and audits.

How to Set Up a Document Set in SharePoint

Step 1: Enable Document Sets

Before using Document Sets, you need to activate the feature.

  • Navigate to your SharePoint site.
  • Click on the gear icon (⚙️) in the top-right corner and select Site settings.

Click on the gear icon () in the top-right corner and select Site settings.

  • Under Site Collection Administration, click Site Collection Features.

Under Site Collection Administration, click Site Collection Features

  • Scroll down and find Document Sets.

Scroll down and find Document Sets.

  • Click Activate.

Step 2: Create a Document Set Content Type

To create a Document Set, you must first define it as a content type.

  • Go to Site settings.
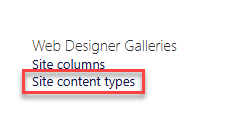
  • Under Web Designer Galleries, click Site content types.

Under Web Designer Galleries, click Site content types.

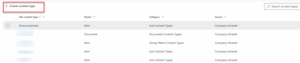
  • Click Create.

Click Create

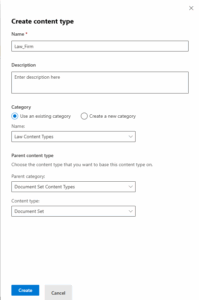
  • Provide a Name (e.g., “Project Files Set”) In the Parent Content Type dropdown, choose Document Set Content Types.

Provide a Name

  • Select Document Set as the parent.
  • Click OK.

Step 3: Configure Document Set Settings

After creating the content type, configure it for your needs.

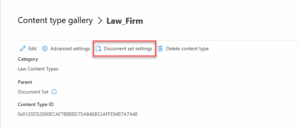
  • In the Site Content Types list, find and select your newly created Document Set.
  • Click Document Set settings.

Click Document Set settings.

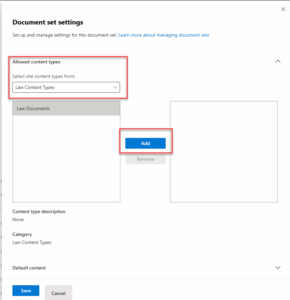
  • Under Allowed Content Types, select the document types that can be included in the set by clicking on Add button.

Under Allowed Content Types

  • Click Save.

Step 4: Add a New Document Set Instance

To create an actual Document Set:

  • Go to the document library where you want to create a Document Set.
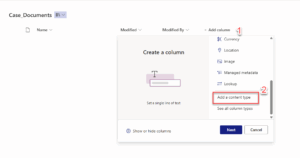
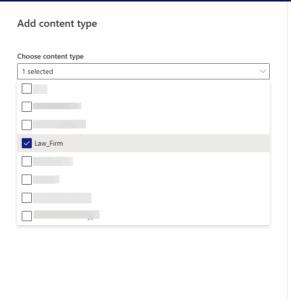
  • Click Add columns, then select Add content type to include the Document Set content type.

Click Add columns

  • Select the Content Type you want to add.

Select the Content Type you want to add

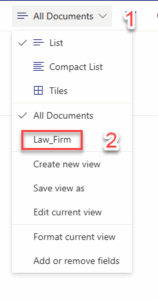
  • Once the content type is added, the view is configured.

Once the content type is added, the view is configured.

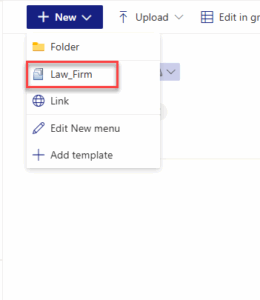
  • Click New, then select your Document Set content type.

Click New, then select your Document Set content type.

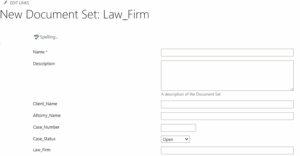
  • Enter the name of the document set and fill metadata values you want to inherit by child documents.

Enter a name of the document set and fill metadata values you want to inherit by child documents.

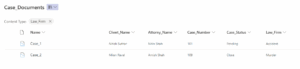
After the Document set is created, add the content inside it. Here we create a Case_1 Document Set with predefined metadata values, any document added inside it will automatically inherit those values.

automatically inherit

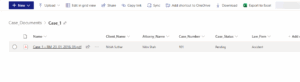
Here, you can see in the image below that we have added the document inside the Document Set Case_1, which has inherited the Case_1 metadata values.

Document Set Case_1

Final Thoughts

Using SharePoint without Document Sets is like managing a library without categories, books scattered everywhere, no system, and endless searching.

With the right setup, everything falls into place:

  • Find documents faster with all related files grouped together
  • Ensure consistency with shared metadata
  • Improve security with unified access controls
  • Reduce manual work with automated workflows

This is where SharePoint document management best practices make all the difference. By leveraging tools like Document Sets, you create a scalable, searchable, and secure file system that supports growth and compliance.

Need help implementing this at scale? The right SharePoint Consulting Services can help you craft a tailored SharePoint Document Management strategy, one that saves time, enhances compliance, and drives collaboration.

Why waste time searching when you can stay organized from day one?

How to Add a Custom Column to a Table Control in Power Apps

If you’re building a user-friendly app with Power Apps, chances are you’ve used Table control to display lists of data in a clean, tabular format. However, one limitation developers often face is the inability to directly add custom columns like you would in a gallery. But don’t worry, there’s a simple workaround!

In this blog, we’ll walk you through how to add a custom column to a Table control by extending the data source using calculated fields. And yes, we’ll keep it easy and beginner-friendly!

Real-World Scenario

Let’s say you’re working with SharePoint data, and your list contains columns like:

  • First Name
  • Last Name
  • Joining Fees (which is a currency column)

Now, when you connect this list to a Power Apps Data Table control, you might notice two things:

  1. The Joining Fees column shows up as just a number it doesn’t look like currency.
  2. There’s no way to show a Full Name by combining the first and last names.

That’s where a small trick using Power Apps formulas comes in handy.

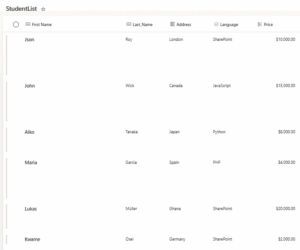
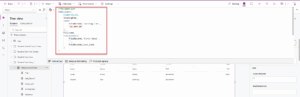
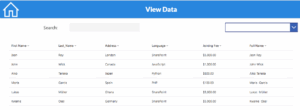
This is the SharePoint data that I want to display in the Power Apps table control.

Power Apps table control

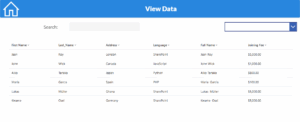
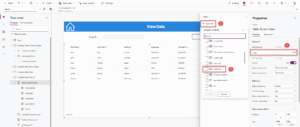
I have now added a custom column in Power Apps and populated it with the data, which is visible in the table control shown in the image below.

Power Apps table control

As we can see here, the ‘Joining Fees’ column in SharePoint is a currency column. However, when we add it to the table control in Power Apps, it doesn’t appear as a currency column. So, we’ll explore how to format this using a custom column. We’ll also look into how we can merge the ‘First Name’ and ‘Last Name’ columns in this Power Apps table column guide.

Step-by-Step Guide to Add a Custom Column

Step 1: Use the Add Columns Function

AddColumns(

    YourSharePointList,

    FormattedFee, Text(ThisRecord.’Joining Fee’, “$#,###.00”),

    Full Name, Concatenate(ThisRecord.’First Name’, ” “, ThisRecord.Last_Name)

)

First, select your Table control and go to its Items property. Instead of just binding your SharePoint list directly, use the AddColumns function to create custom columns:

This creates two new columns: Full Name and Formatted Fees.

Use the Add Columns Function

Step 2: Update the Table Fields

Click on the Table control, then go to the Fields property pane on the right.

  • Click Edit Fields
  • Remove the old columns (like First Name, Last Name, and Joining Fees)
  • Click Add field and select the new custom columns (Full Name and Formatted Fees)

Update the Table Fields

Step 3: Rename the Column Headers

You can rename the column headers to make them user-friendly:

  • Click on each column in the Table control
  • Go to the Header Text property
  • Change it to something like “Full Name” or “Joining Fees”

Rename the Column Headers

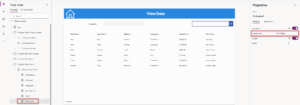
What You Get in the End

Now, your Table control will display:

  • A clean Full Name column combining first and last names
  • A Joining Fees column formatted as currency

This not only makes your app look more professional but also improves the user experience.

Table control

Bonus Tips

  • You can use the same method to add columns like Age (from Birthdate), Status Labels, or even calculated totals.
  • Keep your formulas simple for better performance.
  • Always test on a small set of data first.

Conclusion

Customizing a Table control in Power Apps doesn’t have to be complicated. With a simple formula and a few clicks, you can shape your data the way you want. By using AddColumns, you gain the ability to enhance your app’s visuals and functionality all without using collections or complex logic.

This trick is especially helpful when you need to merge fields, apply formatting, or display user-friendly data views. Keep experimenting, and you’ll discover how flexible and powerful power apps development services can be.

How to Use Parse JSON in Power Apps for Efficient Data Handling

Handling large or complex datasets in Power Apps can quickly hit limitations—especially with Power Automate’s manual trigger inputs capped at 20. This can complicate efforts to automate processes that involve SharePoint or other data sources. Fortunately, by using JSON parsing within Power Apps, you can work around these restrictions and unlock far more flexible, scalable data handling.

In this guide, we’ll show you step by step how to set up and use Parse JSON Power Automate and Power Apps, so you can retrieve, process, and display SharePoint list data efficiently in your apps. Whether you’re building internal tools or streamlining business workflows, this approach will help you get the most out of the Power Platform.

Follow these steps to set up your SharePoint list and Power Apps flow for JSON parsing:

Step 1: Create a list in the SharePoint site with the following columns:

  •   Student Name: Single Line of Text
  •   Birth Date: Date Only
  •   Course Name: Single Line of Text
  •   Course Price: Currency
  •   Course Expire Year: Number

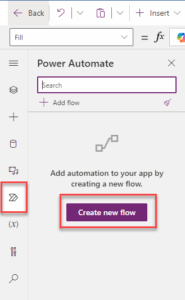
Step 2: Create a new blank canvas in Power Apps. Then, from the left navigation menu, click on Power Automate and create a new flow.

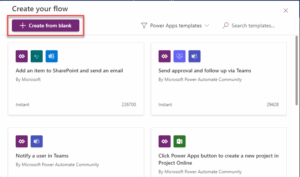
Step 3: After clicking “Create new flow,” click “Create from blank.

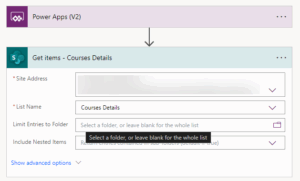
Step 4: After creating the flow, add an action to “Get items” and select the site and list from where you will retrieve the data.

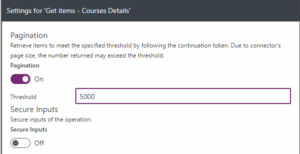
Step 5: SharePoint Get Items action returns up to 100 records by default. To increase the limit, go to the action’s settings menu, turn on pagination, and enter a number in the threshold field. The maximum value is 5000.

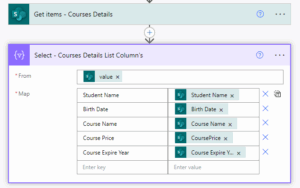
Step 6: Add a “Select” action from the Data Operation after the “Get items” action. Using the “Select” action, you can specify which columns you need.

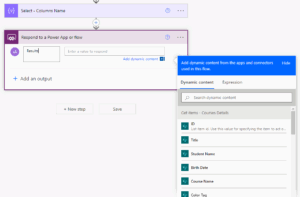
Step 7: Add a “Power Apps – Respond to a PowerApp or flow” action at the end of the flow. Add a text type output called “Results.” Note that the “Select” action output does not appear in the Dynamic content.

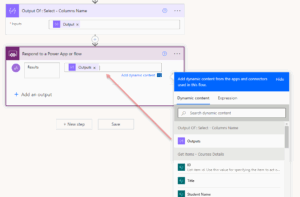
Step 8: To get the output, there are two ways. First, add a “Compose” action and put the “Select” output in the “Compose.” Then, put the “Compose” action output in the “Respond to a PowerApp or flow” action.

Step 9: Another way you can manually type the expression like this.

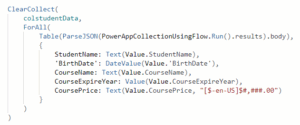
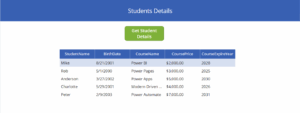
Step 10: Now, add a button to the screen in Power Apps. When this button is pressed, we want to load the flow output into a collection. On the button’s On Select property, we need to create a collection.

Step 11: To display the data on the screen, we have added a data table. In the data table’s data source, we selected the collection we created. Then, we chose the fields we wanted to show in the table.

Conclusion

This guide offers a thorough walkthrough for integrating power apps Parse JSON to manage data in Microsoft Power Automate. By following the steps, users can set up Parse JSON in power automate, streamlining automation and data handling. From creating SharePoint lists to displaying data, it enhances workflow efficiency in the Power Platform ecosystem.

For businesses looking to optimize these processes, partnering with power apps development services can further improve solution design and implementation.

Microsoft 365 Copilot vs Google Workspace Gemini: Ultimate 2026 Comparison

Microsoft and Google are changing how people work by adding smart assistance into everyday office tools. Email, documents, spreadsheets, and meetings are no longer just manual tasks. They now include built-in help that can draft, summarize, and organize work faster. 

For businesses, the real decision is not just about features. It is about choosing the platform that fits how teams already collaborate. The right assistant should feel natural inside the tools employees use daily. 

This article compares gemini vs copilot how each option works, where it fits best, and what makes them different. So, that you can choose the right solution for your organization.

Microsoft 365 Copilot vs Google Workspace Gemini Overview

Gemini for Google Workspace and Copilot for Microsoft 365 are AI tools designed to improve productivity and make daily work easier. Designed for business and enterprise environments, each solution embeds AI directly into familiar tools to help teams work smarter and faster. Here is a simple comparison of what each one offers.

What is Gemini for Google Workspace?

Gemini for Google Workspace is Google’s AI assistant built into apps like Gmail, Docs, Sheets, Slides, Drive, and Meet. It can summarize emails, suggest quick replies, help write and edit documents, create formulas in Sheets, generate images in Slides, and take notes during meetings in Meet. It uses Google’s Gemini AI models to generate text and images.

What is Copilot for Microsoft 365?

Copilot for Microsoft 365 is Microsoft’s AI assistant built into apps like Word, Excel, PowerPoint, Outlook, and Teams. It can help write documents, analyze data in Excel, create presentations, summarize emails and meetings, and provide insights based on company data. Designed for enterprise environments, Microsoft 365 Copilot for business uses advanced AI models connected to Microsoft Graph to work across your organization’s information.

Core Differences Between Copilot and Gemini

Here is a side-by-side comparison of Microsoft Copilot and Google Gemini across key capabilities.

Feature Gemini (Google Workspace) Copilot (Microsoft 365)
Overall Focus Cloud collaboration and real-time productivity Enterprise productivity and workflow automation
Ratings Around 4.4/5 (G2) Around 4.8/5 (G2)
Models Gemini Flash and Pro models GPT-4 class models with ongoing upgrades
Best Use Case Browser-based collaboration and multimodal tasks Deep productivity across Microsoft apps
Writing Style Structured and factual More expressive and flexible tone control
Image Capabilities Strong image generation and visual understanding More limited image tools
Web Access Real-time access through Google Search Web access through Microsoft search stack
Coding Support Solid general coding support Strong developer ecosystem with GitHub Copilot
Productivity Integration Native to Google Docs, Sheets, Gmail, Meet Native to Word, Excel, PowerPoint, Outlook, Teams
File Handling Strong with Google formats and PDFs Strong with Word, Excel, and PowerPoint files
User Experience Clean, fast, browser-first Varies across apps and environments
Data Access Mostly app-level context Cross-app context using Microsoft Graph
Meetings Summaries and notes in Google Meet Recaps, summaries, and coaching in Teams
Extensibility Google Cloud, Vertex AI, Apps Script Copilot Studio, plugins, Azure integrations
Pricing Model Included in Workspace tiers or Gemini plans Requires Microsoft 365 plus Copilot add-on
Strengths Simplicity and multimodal capabilities Enterprise integration and automation depth

Note: Both platforms evolve quickly, and features may change as Microsoft and Google release updates.

Copilot vs Gemini: A Comparison Across Key Areas

As AI assistants become more popular, two major players are Copilot (by Microsoft) and Gemini (by Google). Both have their strengths, but they work differently depending on what your business needs. Let’s compare gemini vs copilot in essential areas:

  1. Ecosystem Integration
    In the debate of google workspace gemini vs microsoft copilot, ecosystem alignment matters most.

Copilot integrates deeply with Word, Excel, Teams, SharePoint, and Azure. Businesses already invested in Microsoft benefit from seamless workflows and structured automation.

Google workspace gemini for business integrates tightly with Gmail, Docs, Sheets, Drive, and Google Cloud. It works best for teams operating fully inside Google’s environment.

  1. Enterprise Data Integration
    Copilot excels at working with enterprise data within Microsoft 365. It can pull information from SharePoint, OneDrive, Azure, and Power BI, helping businesses analyze large datasets, streamline workflows, and make informed decisions. 

Gemini focuses on Google Cloud, using tools like BigQuery, Looker, and Cloud Storage. It provides AI-driven insights and real-time analytics, ideal for organizations invested in Google services. Integrating Gemini with non-Google systems or legacy data may require extra customization.

  1. In-App Assistance
    Both AI assistants provide real-time help inside their respective apps. Copilot helps with document creation, data analysis, and email drafting. It suggests edits and automates repetitive tasks within Microsoft apps that are part of broader microsoft 365 solutions used by enterprises. 

Gemini helps users draft emails, create presentations, summarize content, and complete data tasks inside Google apps. While effective, Gemini may be slightly less capable than Copilot in handling complex enterprise workflows.

  1. Chatbot Interface
    Copilot offers a chatbot within Microsoft 365 and Teams, answering questions, providing insights, and helping users access data instantly. 

Gemini’s chatbot works across Google services and supports conversational AI for answering queries, summarizing information, and assisting with tasks. It is flexible and works outside Google’s ecosystem, but may not be as embedded in enterprise workflows as Copilot.

  1. External Information & Plugins
    Copilot integrates with LinkedIn, GitHub, and Power Automate, supported by expanding microsoft copilot services.

Gemini pulls information directly from Google Search and APIs. However, in gemini vs copilot comparisons, Copilot’s enterprise plugin ecosystem is generally considered more mature.

Use Cases: When to Choose Copilot vs Gemini

When evaluating Microsoft 365 Copilot vs Google Workspace Gemini, the right choice depends on your existing digital workplace and how your teams collaborate daily. Each platform delivers the most value when aligned with the tools your organization already relies on.

Choose Microsoft 365 Copilot if…

  • Your organization already runs on Microsoft 365
  • Teams rely heavily on desktop Office apps
  • You need cross-application workflows across documents, emails, and meetings
  • You want deeper integration with internal business data
  • You need structured automation across workflows
  • Security and enterprise controls are a major factor

Choose Google Gemini if…

  • Your business primarily uses Google Workspace
  • Your workflows are browser-based and cloud-first
  • Real-time collaboration in Docs, Sheets, and Gmail is a top priority
  • You prefer lightweight tools that are easy to adopt
  • You value simplicity and fast drafting support
  • A clean, intuitive user experience matters most

Microsoft 365 Copilot vs Google Workspace Gemini: Which Is Right for Your Business

When deciding between google workspace gemini vs microsoft copilot, focus on ecosystem alignment, data strategy, and long-term scalability.

If your company depends on Microsoft apps, Copilot integrates seamlessly and enhances enterprise productivity. Organizations leveraging Azure and structured workflows often favor Microsoft’s environment and broader Microsoft 365 solutions.

If your company operates primarily in Google Workspace and Google Cloud, Gemini offers strong collaboration tools and multimodal AI support.

Some businesses also explore Microsoft 365 Copilot vs ChatGPT when evaluating AI productivity tools. However, Copilot is directly embedded inside Microsoft 365 apps, making it more workflow-oriented compared to standalone AI chat platforms.

Ultimately, the gemini vs copilot decision depends on where your teams already work and how deeply you want AI integrated into your enterprise systems.

How Reality Tech Helps You Implement the Right AI Productivity Solution

Choosing between microsoft 365 copilot vs google workspace gemini is just the beginning. The real results come from setting it up the right way.

Many businesses comparing gemini vs copilot find that Microsoft 365 offers better control, security, and long-term scalability. Google Workspace works well for simple, cloud-based teams, but companies that need deeper integration often choose Microsoft.

Reality Tech helps you implement microsoft 365 copilot for business step by step. We support planning, migration, setup, customization, and security. Our team ensures AI tools fit your daily workflows and integrate smoothly with your existing systems. With expert microsoft copilot services, you can adopt AI without confusion or disruption.

If you are deciding between copilot vs gemini comparison, book a consultation with Reality Tech and get a clear, practical plan to bring AI into your workplace.

Newsletters