

Data Structure, Lists, and Column Definitions
This section explains how the Reporting Portal is structured in SharePoint and how data flows between Departments, Categories, Subcategories, and Quick Links.
Understanding these lists and their columns will help users and administrators manage content correctly.
1. Solution Installation and Deployment
Upload Solution to the App Catalog
- Navigate to the SharePoint Admin Center
- Go to Apps → App Catalog
- Upload the Reporting Portal .sppkg solution file to Apps for SharePoint
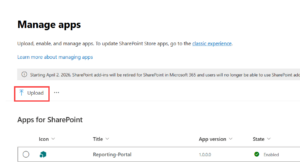
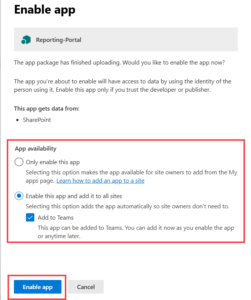
- Choose whether to deploy the app to:
- All sites, or
- Selected sites only
- Click Enable App after upload
2. Adding the Web Part to a SharePoint Site
Add the App to the Site
- Navigate to the SharePoint site where the Reporting Portal will be used
- Go to Site Contents → + New → App
- Select Reporting Portal from My Apps
- Add the app to the site
Add the Web Part to a Page
- Open the target SharePoint page
- Click Edit
- From the web part toolbox, search for Reporting Portal
- Add the web part to the page
- Publish the page
3. Reporting Portal Data Hierarchy
The Reporting Portal follows this hierarchy:
Department → Category → SubCategory → Quick Links
Each level is managed using a dedicated SharePoint list. The Reporting Portal web part reads data from these lists to dynamically render the UI.
4. Departments List
Purpose:
Defines all departments displayed on the Reporting Portal home page.
List Name: Departments
Columns
| Column Name | Column Type | Description |
|---|---|---|
| Title | Single line of text | Name of the department (e.g., FinanceHQ, IT, Tax) |
| Color | Single line of text | Hex color code used for department styling (e.g., #8E24AA) |
Usage in Portal
- Displayed as department tiles on the home page
- Color column is used for UI theming
- Clicking a department loads its categories
5. Category List
Purpose:
Stores categories under each department. Categories are displayed as columns on the department page.
List Name: Category
Columns
| Column Name | Column Type | Description |
|---|---|---|
| Title | Single line of text | Category name (e.g., Daily, Monthend Reporting) |
| Department | Lookup (Departments) | Links the category to a department |
Usage in Portal
- Each category is shown as a column
- Categories are filtered based on the selected department
6. SubCategory List
Purpose:
Defines subcategories that appear under each category.
List Name: SubCategory
Columns
| Column Name | Column Type | Description |
|---|---|---|
| Title | Single line of text | Subcategory name (e.g., Asset Inventory, Balance Report) |
| Department | Lookup (Departments) | Identifies the department |
| Category | Lookup (Category) | Links subcategory to its parent category |
Usage in Portal
- Subcategories appear under their respective category columns
- Used to group reports logically
7. Quick Link List
Purpose:
Stores report metadata and document links displayed in the portal.
List Name: Quick Links
Columns
| Column Name | Column Type | Description |
|---|---|---|
| Title | Single line of text | Subcategory name (e.g., Asset Inventory, Balance Report) |
| Department | Lookup (Departments) | Identifies the department |
| Category | Lookup (Category) | Links subcategory to its parent category |
| SubCategory | Lookup (SubCategory) | Subcategory grouping |
| ReportURL | Hyperlink | Direct link to the report document |
Usage in Portal
- Report titles are rendered as clickable links
- Clicking a report opens the document in SharePoint
- Filtering is done based on Department, Category, and SubCategory
8. How Data Appears in the Reporting Portal
Home Page
- Displays Departments using the Departments list
Department Page
- Categories are shown as columns
- Subcategories appear under each category
- Reports are listed as clickable links within subcategories
All rendering is dynamic and metadata driven.
9. Content Management Guidelines
Adding a New Department
- Add a new item to the Departments list
- Provide a title, color, and description
Adding a Category
- Add an item to the Category list
- Select the appropriate Department
Adding a SubCategory
- Add an item to the SubCategory list
- Select both Department and Category
Adding a Report
- Add an item to the Quick Links list
- Map it to the correct Department, Category, and SubCategory
- Provide a valid Report URL
Note: No code changes are required for any of the above actions.
10. Best Practices
- Ensure lookup relationships are accurate
- Avoid duplicate category or subcategory names under the same department
- Use consistent naming conventions
- Verify permissions for report documents
- Validate URLs before saving report items
11. Key Notes
- All portal content is driven by SharePoint lists
- Changes reflect automatically after page refresh
- The Reporting Portal does not store documents—only links and metadata
- Permissions are controlled entirely through SharePoint
12. Support
For assistance or questions:
Email: Joel@reality-tech.com
Support: https://ravi.span7.in/contact-us/